
Large-scale Angular applications. What are the best practices to structure your project so it would be comparatively more comfortable to develop and maintain it?
There are plenty of existing style guides. Consider checking at least these two: official Angular guidelines and John Papa’s style and file structure.
Likewise others, I also decided to share my thoughts on a file structure for the large Angular apps. This article is a collection of practices based on my personal experience and experimentations with different styles.
I am using Angular4 mostly for our brand licensing CRM system at Flowhaven. It is a pretty complicated project which consists of different modules such as agreement management, content management, sales reports validation, design approval tool, etc.
We are also using NgRx implementation of Redux for managing the state of the Flowhaven application.
In this article, I will explain what approach to structuring files we are using at Flowhaven to make our development, maintenance and releasing process smoother.
The article will consist of two parts.
In the first part, I will touch the main Angular project structure, and in the second part, I will talk about the Redux store specifics.
Modules
First of all, Angular modularity is just excellent. It helps you to consolidate components, directives, and pipes into the application into independent blocks of functionality. Each focused on a feature area.
Modules are a great way to organize an application and extend it with capabilities from external libraries.
What is the most significant benefit of the independent modules?
You can develop and release each module in isolation so that it won’t affect the rest of the application. It is especially important in case of large-scale apps.
For instance, in the Flowhaven application, we have separate NgModule for each of the functional parts, such as sales reports and design approval. And each of these modules has its scope.
Shared Module
But hey, what about the parts of the application which we are using across all the modules? For example, an UploadService for uploading files to either Salesforce or Google Drive or NoPreviewDirective for displaying the corresponding image when there’s an image error.
The good practice for it is to have a separate module called SharedModule. It should contain all the components, directives, services, and pipes which are accessible in the whole app.
It will help you follow one of the fundamental principles of programming called DRY (stands for Don’t Repeat Yourself), as well as maintain all the shared components in one place.

Let’s sum up the modularity principle. Logically divide your application into individual, feature-based modules. Don’t forget about the SharedModule, add all the general stuff there and make it accessible by including to exports.
You can represent it with a metaphor.
Your is application is an apartment. It has own functional parts: bathroom, kitchen, bedroom. Each of them has specific tools such as washing machine, oven, bed, TV, and shared ones such as a laptop, which you could use anywhere, chairs, a cup of tea, etc.
Services, Directives, Pipes
Some of the style guides suggest dividing the application into features and add everything related to this feature into one directory. For example, Hero directory might contain hero.component, hero.service, hero.model, etc.
I prefer having separate directories for each type of the files, e.g., all the module’s services are inside the corresponding folder.
It should look something like that.

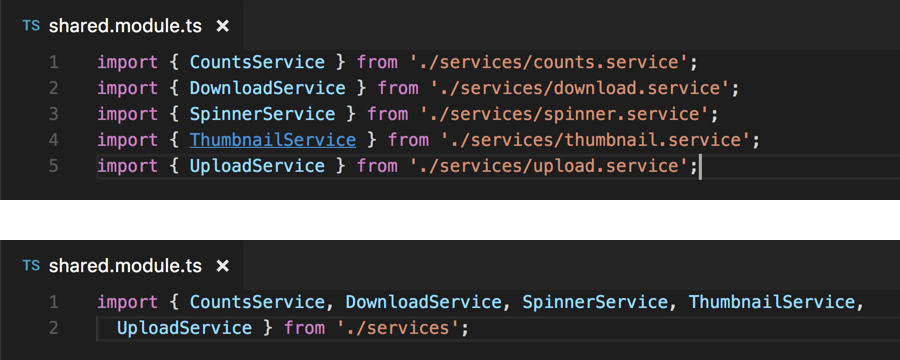
Since ES2015 have come with its excellent modules, we are using them everywhere. To reduce the length of the import paths and keep everything accessible from one source, I like using index file for exports.
I suggest having the following index.ts file in each group directory.
// .src/app/shared/services/index.ts
export * from './counts.service';
export * from './download.service';
export * from './spinner.service';
export * from './thumbnail.service';
export * from './upload.service';
It helps you keep your imports clean. Just consider these two options. Which do you prefer?
Containers and Components
Now we know how to structure the module’s files, but I would like to stop and discuss the components individually.
Containers vs. Components. Stateful vs. Stateless. Smart vs. Dumb.
There are many ways to name them. It came from the React and Redux. A great way to simplify the app and increase performance. React even released function stateless components in the v0.14.
Shortly, what’s the deal?
The idea is to divide all components into two different types. One of them will be managing the state, while the other, pure one, will be just rendering the output and have no logic inside.
It could be a separate article on these. While I haven’t written it yet, I suggest you read the others, for example, Todd Motto.
Since two of the requirements met: we are using Redux Store, and now it’s possible to have dumb components in Angular, I suggest using separate directories for those.
How do components are different from containers in Angular4?
First of all, they have only @Input and @Output and aren’t touching the state by themselves at any point.
Change Detection Strategy
Second, the most important for the performance, the utilization of the OnPush change detection strategy.
import { Component, Input, Output, EventEmitter, ChangeDetectionStrategy } from '@angular/core';

@Component({
  selector: 'app-state-less',
  tempalte: `
    <pre>{{ sample | json }}</pre>
  `,
  changeDetection: ChangeDetectionStrategy.OnPush
})
export class StateLessComponent {
  @Input()
  sample: string;

  @Output()
  update: EventEmitter<string> = new EventEmitter();
}
Generally, in Angular, change detector is always checking for changes. By telling it to use the OnPush strategy, we are forcing it to check the component only once, when we update the state and its input changes.
So, when we update something, change detector doesn’t need to go through all the components and check if we changed anything in them.
Using this logical separation into containers and components helps make their management more comfortable and, most noteworthy, significantly increase performance.
Conclusion

As a result, now you know best practices to follow when structuring the large-scale Angular application:
- Divide the app into isolated, functional modules
- Keep one shared module, which consolidates parts accessible across the whole application.
- Group files by type and have the index file for exporting.
- Divide Angular components into stateful and stateless. Place them into different directories.
There are many opinions on how to structure the application. I shared these ideas based on my personal experience developing complex projects.
Probably, you might want to keep all the components inside one directory instead of splitting them. That’s is completely fine!
My goal is to make you think, considering all the possible options and choose the right one for your needs.
Hope you found this article helpful. Thank you!
You can find the next part about structuring your Redux store files and best practices using actions and reducers here.

Nikita Verkhoshintcev
Salesforce Consultant
Senior Salesforce and full-stack web developer. I design and build modern Salesforce, React, and Angular applications for enterprises. Usually, companies hire me when complex implementation, custom development and UI is required.