
Generally, building modern JavaScript web applications using third-party frameworks for Salesforce is an excellent alternative to standard Lightning Components.
It has lots of benefits such as better development experience, significant performance boost, a faster cycle, framework community and much more.
However, people who are just starting with the custom Salesforce development face one bottleneck, i.e., how to deploy their application to the Salesforce environment?
Of course, there is no problem in deploying it per se.
All you need to do is to upload a static resource containing your application to the organization. The question is how to automate that process to avoid the manual work.
In this post, I would like to share the recipe on how you can automate the deployment of the front-end code to Salesforce using the Ant Migration tool. As an example, I would take the Angular project.
Ant Migration Tool
As an addition to the Force.com IDE, you can also use scripts to deploy the Apex code.
The Ant Migration Tool is a free resource provided by Salesforce to support its users and partners who want to perform a file-based deployment of metadata changes between the local directory and a Salesforce organization.
First of all, you need to have the Java JDK installed.
You can download it here or install via Homebrew as
brew cask install java
Then visit http://ant.apache.org/ and install Apache Ant (v1.6+) or run Homebrew command
brew install ant
As the last step, you need to download the Salesforce Ant Migration Tool here and move it to the root of the project directory.
Assuming we have the standard Angular project generated via Ng CLI, the ant-salesforce.jar file should be along the package.json and others.
Meta Data
What we are planning to do is to create the /src/salesforce/ directory which will contain the package metadata for the Ant tool.
Initially, the Angular build command compiles and bundles the JavaScript code and copies all the static assets from /src/assets/ to /dist/ directory.
Therefore, we need to modify the standard Ng CLI script also to copy the metadata contents.
Open the .angular-cli.json file and add "salesforce" to "app.assets" so that it should look like the following.
// .angular-cli.json
{
  ...
  "apps": \[
    {
      "root": "src",
      "outDir": "dist",
      "assets": \[
        "assets",
        "salesforce",
        "favicon.ico"
      \],
  ...
}
Next, let's figure out how the metadata should look.
Create the file named package.xml in the /src/salesforce/ directory. It should have the name of a static resource which we will deploy to the Salesforce.
If you bootstrap application inside the Visualforce page, you need to include it as well. Otherwise, for Lightning Components, the static resource should contain the index.html
<?xml version="1.0" encoding="UTF-8"?>
<Package xmlns="http://soap.sforce.com/2006/04/metadata">
  <types>
    <members>DigitalFlaskApp</members>
    <name>StaticResource</name>
  </types>
  <types>
    <members>DigitalFlaskApp</members>
    <name>ApexPage</name>
  </types>
  <version>43.0</version>
</Package>
Then we need to create two separate directories for static resource and page to replicate the Salesforce project structure.
Each of these directories should also have the individual metadata XML file describing the file.
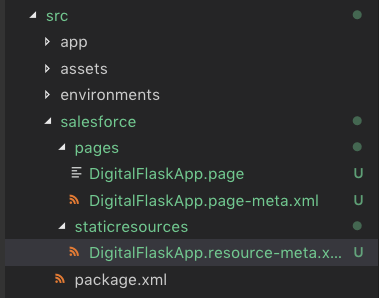
So then copy the code below to the corresponding files.
// DigitalFlaskApp.resource-meta.xml
<?xml version="1.0" encoding="UTF-8"?>
<StaticResource xmlns="http://soap.sforce.com/2006/04/metadata">
  <cacheControl>Private</cacheControl>
  <contentType>application/zip</contentType>
</StaticResource>

// DigitalFlaskApp.page-meta.xml
<?xml version="1.0" encoding="UTF-8"?>
<ApexPage xmlns="http://soap.sforce.com/2006/04/metadata">
  <apiVersion>40.0</apiVersion>
  <availableInTouch>false</availableInTouch>
  <confirmationTokenRequired>false</confirmationTokenRequired>
  <label>DigitalFlaskApp</label>
</ApexPage>
We have everything set up, and we can continue with the building script itself.
Build Script
As a result, we want to write the NPM script to build the Angular application, archive all the required files, and deploy them to the specified Salesforce organization.
For building the Angular app, we already have the standard command ng build. We can also archive files using the standard system command zip.
However, before we can use the Ant script, we need to do a couple more steps.
We need to create the file describing the project for Ant and its commands. In addition to it, we will create the file to hold the Salesforce credentials which would be used by the Ant tool.
Create the file build.properties file and assign your username and password as environment variables.
// build.properties
env.SB\_USERNAME = sample@digitalflask.com.sb
env.SB\_PASSWORD = ...
Then create the build.xml file.
// build.xml
<project name="DigitalFlaskApp" default="no-default-target" basedir="." xmlns:sf="antlib:com.salesforce">
  <property file="build.properties" />
  <property environment="env" />

  <property name="production.pollWaitMillis" value="10000" />
  <property name="production.maxPoll" value="200" />
  <property name="sandbox.pollWaitMillis" value="10000" />
  <property name="sandbox.maxPoll" value="200" />
  <property name="checkOnly" value="true" />

  <target name="no-default-target">
    <echo>You must specify a target</echo>
  </target>

  <taskdef resource="com/salesforce/antlib.xml" uri="antlib:com.salesforce">
    <classpath>
      <pathelement location="./ant-salesforce.jar" />
    </classpath>
  </taskdef>

  <target name="sb">
    <sf:deploy username="${env.SB\_USERNAME}" password="${env.SB\_PASSWORD}" serverurl="https://login.salesforce.com"
      maxPoll="${production.maxPoll}" pollwaitmillis="${production.pollWaitMillis}" deployRoot="dist/salesforce"
      rollbackOnError="true" />
  </target>
</project>
Later we will use the target name in the Ant script as "ant $TARGET_NAME" to run the specific deploy comment.
You can use multiple targets with the corresponding credentials to deploy code to any desired organization.
Now, let's write the NPM script containing all these commands.
Open the package.json file and add the new script called "build."
It should have the following:
- ng build --prod --output-hashing none – build the Angular application for production and remove the hash code from file names as we don't have to worry about the caching.
- zip -r dist/salesforce/staticresources/FH_App.resource dist/assets dist/inline.bundle.js dist/main.bundle.js dist/polyfills.bundle.js – Zip archive all the required files to the Salesforce directory so Ant Migration Tool will be able to deploy it.
- ant $TARGET – run the specified deploy command
So the final script will look like:
ng build --prod --output-hashing none && zip -r dist/salesforce/staticresources/FH\_App.resource dist/assets dist/inline.bundle.js dist/main.bundle.js dist/polyfills.bundle.js && ant $TARGET
And you can use it as:
TARGET=sb npm run build
Summary
In summary, I hope that you got the idea of how you can automate the deployment of your front-end code to the Salesforce.
As a result, you can work on the project locally and effortlessly deploy it to any desired environment in complete isolation from the rest of the things, e.g., back-end code, team.
It helps your team to split the back-end and front-end to work independently.
Of course, depending on the team, you may have all the code base within one Git repository and deploy everything along the way. All you need is to adjust the project structure accordingly.
Generally, this was just an introduction on how you could improve the DevOps.
You can go further and extend this. For instance, coupled with CI/CD tools this approach would help you to speed up the product development cycle moreover.

Nikita Verkhoshintcev
Senior Salesforce Technical Architect & Developer
I'm a senior Salesforce technical architect and developer, specializing in Experience Cloud, managed packages, and custom implementations with AWS and Heroku. I have extensive front-end engineering experience and have worked as an independent contractor since 2016. My goal is to build highly interactive, efficient, and reliable systems within the Salesforce platform. Typically, companies contact me when a complex implementation is required. I'm always open to collaboration, so please don't hesitate to reach out!


