
Nowadays JavaScript is everywhere. It has a vast ecosystem of open-source libraries, frameworks, superset languages, and tools. With all these technologies available you can build highly interactive and very complex web applications.
For instance, Netflix uses ReactJS library, and InvisionApp uses both ReactJS and AngularJS in their web application.
JavaScript also becomes very handy for building Salesforce business applications. Of course, you can make a custom UI with VisualForce, but such frameworks as AngularJS not only reduce the development time but also allow you to create a SPA (Single Page Application) within SF environment.
There are some of its advantages:
- SPA can redraw any part of the UI. All the dynamic changes occur in the browser. No need for server roundtrips to retrieve an HTML.
- Most resources (HTML, CSS, JS) are loaded once.
- With SPA you can reduce the number of database queries.
- Easier state tracking. No need to use cookies, local and session storages to remember state between page loads.
In the first part of this series, I will show how to build a simple Angular2 application and connect it to the Salesforce REST API to get data for our model.
Angular 2
What is Angular?
AngularJS is an MVC/MVVM JavaScript framework for building dynamic web applications. I will be using Angular2 for this post to take advantage of the modern JavaScript features.
Angular2 is written in TypeScript. TypeScript is a superset of JavaScript which has such benefits as optional static typing, access to ES6/ES7 features, and great tooling support (autocompletion, navigation, and refactoring).
Also, Angular2/TypeScript combo might be appealing for Java developers. The code looks clean, and they can read and understand most of it right away.
Apex Class
First of all, let’s start with the backend. The goal is to send a JSON data to the Angular application. There are plenty solutions to do so.
You can use scripts internally in the VF page and get data via sObject. It’s not the best option because it’s harder to read and maintain.
You can create endpoints via Apex REST and send JSON data as a response. Though it’s a good option, I will be using the AJAX toolkit because I find it more flexible. This kit allows you to execute public webService method and return a JSON string.
Let’s create a simple Apex class named ModernSalesforce.cls. It will send a list of dummy contacts in the JSON format.
global class ModernSalesforce {
  global class Contact {
    public String name;
    public Integer id;
    public Contact(String name, Integer id) {
      this.name = name;
      this.id = id;
    }
  }
  @RemoteAction
  webservice static String getContacts() {
    List contacts = new List();
    contacts.add(new Contact('Madeleine Black', 11));
    contacts.add(new Contact('Frank Pullman', 12));
    contacts.add(new Contact('Samantha Hill', 13));
    contacts.add(new Contact('Sam Ince', 14));
    contacts.add(new Contact('Joseph Hughes', 15));
    contacts.add(new Contact('Karen Randall', 16));
    contacts.add(new Contact('Benjamin Manning', 17));
    contacts.add(new Contact('Katherine Wright', 18));
    contacts.add(new Contact('Thomas Vance', 19));
    return JSON.serialize(contacts);
  }
}
We can leave this class for now because we will write the application logic on the client side.
Preparation
Before writing any JavaScript code we need to do some preparations. You need to check if you already have NodeJS and NPM and install them if needed.
Also, for this project, I will use Angular-CLI. It’s a command line interface for Angular. With this great tool, you can generate components, test an application, and put it in production with just one line commands.
To use this interface you need to install it globally via NPM.
npm install -g angular-cli
Let’s create an Angular2 project and run a development server.
ng new ModernSalesforce
cd ModernSalesforce
ng serve
These commands will create a ModernSalesforce directory, install all the dependencies and run a server at http://localhost:4200/. The app will automatically reload if you change any of the source files.
The existing app is ready to use. I’m not going to dive deep into Angular2, my goal for this post is to show how to connect this app to Salesforce.
Get Data
First of all, let’s create a Contact class. It’s not necessary, but I will do that to demonstrate a static typing functionality of a TypeScript. Create a contact.ts file inside /app directory.
export class Contact {
  id: number;
  name: string;
}
Let’s add it to our application. Go to src/app/ and open an app.component.ts file and import Contact class.
import { Contact } from "./contact";
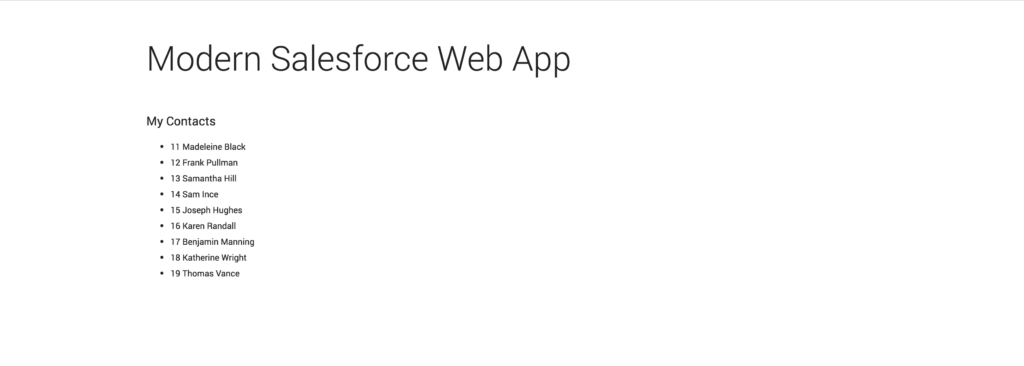
Now we need to update our AppComponent class. Change title to “Modern Salesforce Web App” and create a contacts variable.
I’m going to use global sforce variable from the AJAX library to execute getContacts() method. Notice that this method will return a string, so we need to parse it.
export class AppComponent {
  title: string = "Modern Salesforce Web App";
  contacts: Contact[] = JSON.parse(sforce.apex.execute("ModernSalesforce", "getContacts", {}));
}
TypeScript compiler will throw an error “Cannot find name ‘sforce'”. To avoid this we need to declare sforce variable of type any.
declare let sforce: any;
You can test an application with dummy data on the development server. To do so, just add a global sforce variable to index.html to replicate a method call.
<script>
  var sforce = {
    apex: {
      execute: function() {
        var contacts = [{
          name: "Madeleine Black",
          id: 11
        }, ...]
      }
    }
  }
</script>
To see the actual data in the browser, we need to update a template in @Component decorator as well. To keep it simple, let’s use template internally for now.
@Component({
  selector: 'app-root',
  template: `
    <div class="container">
      <h1>{{title}}</h1>
      <div class="grid">
        <div>
          <h2>My Contacts</h2>
          <ul>
            <li *ngFor="let contact of contacts">
              {{contact.id}} {{contact.name}}
            </li>
          </ul>
        </div>
      </div>
    </div>
  `,
  ...
})
If you navigate to the http://localhost:4200/ you will notice a list of the contacts.
Adding functionality
I want to add some styles and functionality before putting the app to the Salesforce.I will add some general CSS to the index.html page.
<style>
  @import url('https://fonts.googleapis.com/css?family=Roboto:300,400');
  .container {
    margin: 3.5em auto;
    padding: 0 1em;
    max-width: 75em;
    color: #222;
    font-family: 'Roboto', sans-serif;
  }
  h1 {
    font-size: 3.5em;
    font-weight: 300;
  }
  h2 {
    font-size: 1.25em;
    font-weight: 400;
  }
  li, label, input {
    font-size: 0.875em;
  }
  li {
    line-height: 1.9;
  }
  input {
    border: none;
    outline: none;
    border-bottom: 2px solid #999;
    margin-left: 1.25em;
    padding-left: 0.5em;
    padding-bottom: 0.5em;
  }
  input:focus{
    border-bottom: 2px solid #8e44ad;
  }
  .grid {
    display: flex;
  }
  .grid > div {
    flex-grow: 1;
  }
</style>
Now let’s add a search box to filter contacts by name. We need to create a new pipe for that purpose.
ng generate pipe Search
Angular CLI did almost everything for us. The only thing left is to update the transform method.
import { Pipe, PipeTransform } from '@angular/core';

@Pipe({
  name: 'search'
})
export class SearchPipe implements PipeTransform {

  transform(value: any, searchTerm: string): any {
    if (searchTerm) {
      value = value.filter((item) => {
        return item.name.startsWith(searchTerm);
      });
    }
    return value;
  }
}
We need to update the template to use this pipe. I will also add an input field to define a searchTerm variable.
<div>
  <h2>My Contacts</h2>
  <label>Find contact</label>
  <input [(ngModel)]="searchTerm" placeholder="Search for names">
  <ul>
    <li *ngFor="let contact of contacts | search:searchTerm">
      {{contact.id}} {{contact.name}}
    </li>
  </ul>
</div>
Let’s also create one more component, which will represent contact details.
ng generate component ContactDetails
You need to import Input decorator and don’t forget about Contact class.
import { Component, Input } from '@angular/core';
import { Contact } from "../contact";

@Component({
  selector: 'contact-details',
  template: `
    <div *ngIf="contact">
      <h2>{{contact.name}} details!</h2>
      <label>Edit contact:</label>
      <input [(ngModel)]="contact.name" placeholder="Name">
    </div>
  `
})
export class ContactDetailsComponent {
  @Input()
  contact: Contact;
}
We also need to update our AppComponent.
import { Component } from '@angular/core';
import { Contact } from "./contact";

declare let sforce: any;

@Component({
  selector: 'app-root',
  template: `
    <div class="container">
      <h1>{{title}}</h1>
      <div class="grid">
        <div>
          <h2>My Contacts</h2>
          <label>Find contact</label>
          <input [(ngModel)]="searchTerm" placeholder="Search for names">
          <ul>
            <li
              *ngFor="let contact of contacts | search:searchTerm"
              (click)="onSelect(contact)">
              {{contact.id}} {{contact.name}}
            </li>
          </ul>
        </div>
        <contact-details [contact]="selectedContact"></contact-details>
      </div>
    </div>
  `,
})
export class AppComponent {
  title: string = "Modern Salesforce Web App";
  contacts: Contact[] = JSON.parse(sforce.apex.execute("ModernSalesforce", "getContacts", {}));

  selectedContact: Contact;

  onSelect(contact: Contact): void {
    this.selectedContact = contact;
  }
}
The angular application is ready. It’s time to start the migration to Salesforce!
Migrating to Salesforce
Run an Angular CLI command to build the app for production.
ng build --prod
Simple one line command will prepare an HTML page, all the static assets and JavaScript files for us. Already concatenated and minified.
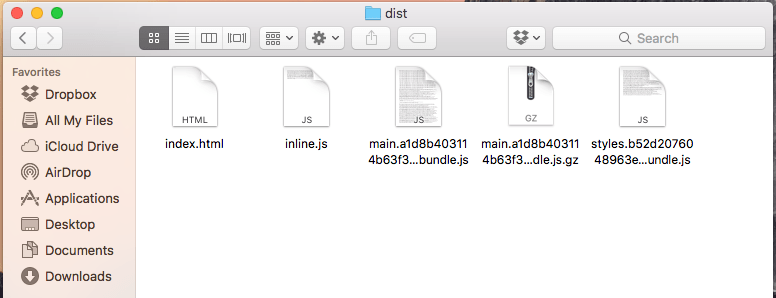
It even creates a gzipped version of the main.bundle.js file. We don’t need to use that because Salesforce uses gzip compression by default for all static resources.
Archive all JS files into one .zip and upload it to SF as a static resource named ModernSalesforce.
The next step is creating VisualForce page to bootstrap our application. This page is almost a copy of index.html from the /dist folder. There are only two things left:
- Include scripts from AJAX toolkit;
- Update src attributes of existing scripts.
    <apex:page standardStylesheets="false" sidebar="false"
      showHeader="false" applyBodyTag="false" applyHtmlTag="false"
      docType="html-5.0" controller="ModernSalesforce">
      <html>
        <head>
          <meta charset="utf-8" />
          <title>ModernSalesforce</title>
          <base href="/" />
          <meta name="viewport" content="width=device-width, initial-scale=1" />
        </head>
        <body>
          <!-- App Root -->
          <app-root>Loading...</app-root><!-- / App Root -->
          <!-- Scripts -->
          <script src="/soap/ajax/21.0/connection.js"></script>
          <script src="/soap/ajax/21.0/apex.js"></script>
          <script type="text/javascript">
            sforce.connection.sessionId = "{!$Api.Session_ID}";
          </script>
          <script src="{!URLFOR($Resource.ModernSalesforce, 'inline.js')}"></script>
          <script src="{!URLFOR($Resource.ModernSalesforce, 'main.887c24097b05abd81d09.bundle.js')}"></script>
          <!-- / Scripts -->
        </body>
      </html>
    </apex:page>
It works perfectly. Now you know how to create a simple Angular2 application and connect it to the Salesforce REST API.

Nikita Verkhoshintcev
Senior Salesforce Consultant
I'm a senior Salesforce consultant based in Helsinki, Finland, specializing in Experience Cloud, Product Development (PDO), and custom integrations. I've worked as an independent consultant building custom Salesforce communities and applications since 2016. Usually, customers reach out to me because of my expertise, flexibility, and ability to work closely with the team. I'm always open to collaboration, so feel free to reach out!


