Not so long ago, I had a case where I needed to implement a custom data table containing the Tasks info and with inline buttons to create new standard Salesforce Task records.
After the creation, it should also refresh the table to include a new task there.
Usually, that's super straightforward.
I've created a button-type column and added an action row handler function.
{
  initialWidth: 120,
  type: 'button',
  typeAttributes: {
    label: 'Create task',
    name: 'create_task',
    title: 'Create task',
    variant: 'brand'
  },
},
handleRowAction(event) {
  const { action, row }  = event.detail;
  if (action.name === 'create_task') {
    // TODO: Create task
  }
}
Unfortunately, it has turned out that it is impossible to have a custom UI form to create Tasks.
Of course, I can use the LWC Navigation, but it doesn't have a success handler as opposed to using the lightning-edit-record-form.
Given the requirements and platform limitations, I've decided to combine NavigationMixin, Trigger, and Platform Events to achieve the goal.
The idea is simple.
First, we invoke the Task creation using the standard platform UI.
Then the Task trigger would publish a custom platform event with the required information about the created Task.
The Lightning Web Component would be listening for such events to refresh the data.
Implementation
Here is how you can implement it.
You can read more about the Salesforce platform events here.
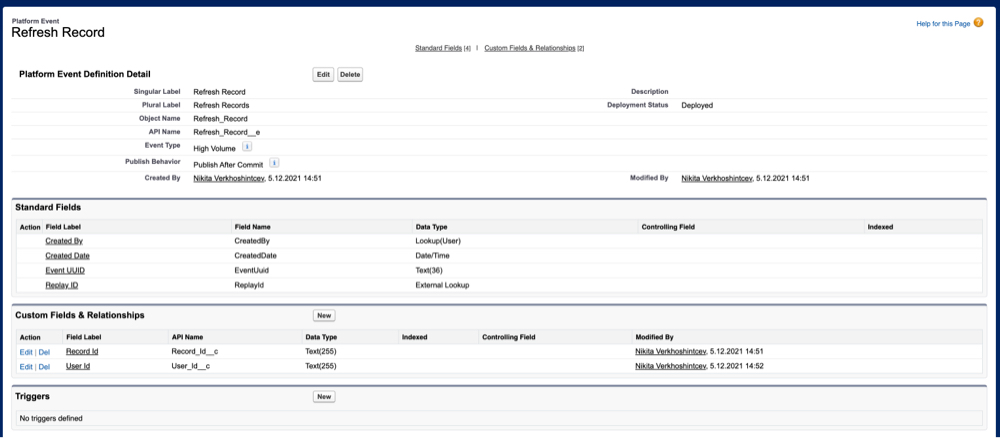
First of all, we need to create a new custom event.
Navigate to Salesforce Setup → Integrations → Platform Events and click on the New Platform Event button.
Enter the details and click Save.
We could also add a few custom fields. For instance, I've created the Record Id and User Id fields that I would require later to update the table.

Let's then create the custom Trigger for the Task object to publish the event that we've just created.
trigger TaskRefreshApex on Task (after insert) {
  List<Refresh_Record__e> refreshRecordEvents = new List<Refresh_Record__e>();
  for (Task task : Trigger.new) {
      refreshRecordEvents.add(new Refresh_Record__e(
        Record_Id__c = task.Id,
        User_Id__c = UserInfo.getUserId()
      ));
  }
  EventBus.publish(refreshRecordEvents);
}
It creates the list of events with the required payload for each inserted Task and publishes them.
We need to do two things inside our Lightning Web Component, i.e., we need to add the action to start the creation of the Task and listen to the platform events to update the UI.
Thankfully, creating the records is easy via NavigationMixin.
handleRowAction(event) {
  const { action, row } = event.detail;
  const defaultFieldValues = encodeDefaultFieldValues({
    WhatId: row.WhatId,
  });
  this[NavigationMixin.Navigate]({
    type: 'standard__objectPage',
    attributes: {
      objectApiName: 'Task',
      actionName: 'new',
    },
    state: {
      defaultFieldValues,
      navigationLocation: 'RELATED_LIST'
    }
  });
}
Note: We define the RELATED_LIST as a navigation location to avoid page refresh.
Note: You can define default field values based on the selected row in the lightning-datatable.
Do not forget to assign a row action handler to the data table. You can read more about the data tables here.
<lightning-datatable
  data="{data}"
  columns="{columns}"
  key-field="id"
  onrowaction="{handleRowAction}"
></lightning-datatable>
Next, we need to listen to the platform event.
You'd have to import a subscribe function first.
import { subscribe } from "lightning/empApi";
Then define the subscription prop and the channel's name based on the custom event API name.
subscription = {};
CHANNEL_NAME = "/event/Refresh_Record__e";
We also need the handler function to refresh the view based on the received message.
Note: By default, the callback function doesn't have access to the component's context. We can use the bind function to set the "this" keyword.
_handleRefreshRecord(event) {
	// business logic to refresh UI
}
handleRefreshRecord = _handleRefreshRecord.bind(this)

connectedCallback() {
  subscribe(this.CHANNEL_NAME, -1, this.handleRefreshRecord).then(response => {
    this.subscription = response;
  });
}
Conclusion
I've demonstrated how you can use Salesforce to publish custom platform events and listen to them inside your Lightning Web Components in this post.
I hope you find this post helpful!
Here is the full version of the component file.
import { LightningElement } from "lwc";
import { NavigationMixin } from "lightning/navigation";
import { subscribe } from "lightning/empApi";

export default class CustomDataTable extends NavigationMixin(LightningElement) {
  data = [
    // data table data
  ];
  columns = [
    // other data table column definitions,
    {
      initialWidth: 120,
      type: "button",
      typeAttributes: {
        label: "Create task",
        name: "create_task",
        title: "Create task",
        variant: "brand",
      },
    },
  ];

  subscription = {};
  CHANNEL_NAME = "/event/Refresh_Record__e";

  _handleRefreshRecord(event) {
    // business logic to refresh UI
  }
  handleRefreshRecord = _handleRefreshRecord.bind(this);

  connectedCallback() {
    subscribe(this.CHANNEL_NAME, -1, this.handleRefreshRecord).then(
      (response) => {
        this.subscription = response;
      },
    );
  }

  handleRowAction(event) {
    const { action, row } = event.detail;
    const defaultFieldValues = encodeDefaultFieldValues({
      WhatId: row.WhatId,
    });
    this[NavigationMixin.Navigate]({
      type: "standard__objectPage",
      attributes: {
        objectApiName: "Task",
        actionName: "new",
      },
      state: {
        defaultFieldValues,
        navigationLocation: "RELATED_LIST",
      },
    });
  }
}

Nikita Verkhoshintcev
Senior Salesforce Consultant
I'm a senior Salesforce consultant based in Helsinki, Finland, specializing in Experience Cloud, Product Development (PDO), and custom integrations. I've worked as an independent consultant building custom Salesforce communities and applications since 2016. Usually, customers reach out to me because of my expertise, flexibility, and ability to work closely with the team. I'm always open to collaboration, so feel free to reach out!
